Originally posted 2018-04-21 10:13:41.
 This tutorial covers the ways to integrate a Sonoff S22 switch into Home Assistant using Sonoff MQTT and flashing Tasmota to replace the supplied Sonoff firmware.
I’m going to cover two different methods to get the switch working in Home Assistant. The first just uses the S22 as it comes out-of-the-box. The second requires flashing Tasmota onto the switch and setting up MQTT in Home Assistant.
Honestly sometimes it seems MQTT is build up as the greatest thing and it is useful however depending on what you want to achievt, it’s not necessarily the best option.
For instance: I have my Raspberry Pi that runs Home Assistant on a smart plug. I suppose this is pretty much a legacy approach because when I had an SD-Card that was not ‘reliable’ I found that Home Assistant would just lock up and become non responsive every day or so. (I no longer have this problem as I was using a better quality SD-Card and lately switched to running off a USB stick as a learning exercise and never switched back). So if Home Assistant is non-responsive and you need to reboot the Raspberry Pi, it’s not much use if the only way to reboot the Pi is to turn it off at the switch and the switch is controlled by MQTT (say if I was away from home and didn’t have physical access to the switch). So in that case it would make more sense to have a switch that worked with Home Assistant but was also independent and could be controlled with an app on my phone if Home Assistant was not responding.
Using Sonoff S22 with Home Assistant without MQTT
The Sonoff S22 as supplied uses an app called Ewelink available on the Apple iOS and Android Play store. So download and install the app.
When you power the switch up, there are two modes you can use to configure the switch to work with the app. If you press and hold the button for 6 seconds it enters a pairing mode which is three flashes followed by a pause and then three flashes etc. When it is in this mode the app will prompt for the network SSID and Password and will then pair to the switch. If this fails, there is also a legacy pairing mode which you use by again pressing the switch for 6 seconds. In this legacy mode, the light will flash constantly. Then you connect to the SSID of the switch and back to the app to configure it with your normal network SSID and password. I’m sorry I don’t have better instructions and screenshots for this but all my switches are now using MQTT. It’s pretty straightforward and the app has good instructions and online help.
Unfortunately, Home Assistant does not have a component built in that supports the Ewelink App. This makes it more difficult to control than if you were using a Wemo or an Xiaomi switch for instance however it can be done fairly easily using IFTTT. I’ve previously documented using IFTTT here (see the bottom of that post) so take a look if you need help getting IFTTT to work.
The S22 is going to be controlled using IFTTT and a Binary Switch in Home Assistant with some Automations.
First step, in your configuration.yaml file you need to add the following information:
# IFTTT
ifttt:
  key: enter-your-ifttt-api-key-here
Get your IFTTT API key from your profile on IFTTT web site. This key enables IFTTT to send commands to the switch using Home Assistant.
We also need to add the Binary Switch in configuration.yaml. Add these lines:
# Sonoff S22 Switches
input_boolean:
  sonoff_switch_2:
  name: Home Assistant Switch
  initial: on
What this does is it creates a slider in the Home Assistant front end that you can use to turn the switch on and off. At the moment we have created the slider and you can switch it on and off but it won’t actually DO anything in the real world!
So we also use some Automations to ‘Do’ something when the slider is switched on or off. Add the following to your automations.yaml file:
- action:
  - data:
      event: sonoff-2-on
    service: ifttt.trigger
  alias: Home Assistant Switch On
  condition: []
  id: 'some-unique-number'
  trigger:
  - entity_id: input_boolean.sonoff_switch_2
    from: 'off'
    platform: state
    to: 'on'
- action:
  - data:
      event: sonoff-2-off
    service: ifttt.trigger
  alias: Home Assistant Switch Off
  condition: []
  id: 'some-unique-number'
  trigger:
  - entity_id: input_boolean.sonoff_switch_2
    from: 'on'
    platform: state
    to: 'off'
So if you look at the trigger for turning the switch on, the trigger is that switch slider being clicked. When that is clicked, Home Assistant sends IFTTT a command with the event ‘sonoff-2-on’. It uses the IFTTT API key you configured so IFTTT knows it’s coming from ‘you’ Similarly, for turning the switch off it will send ‘sonoff-2-off’.
Configuring IFTTT
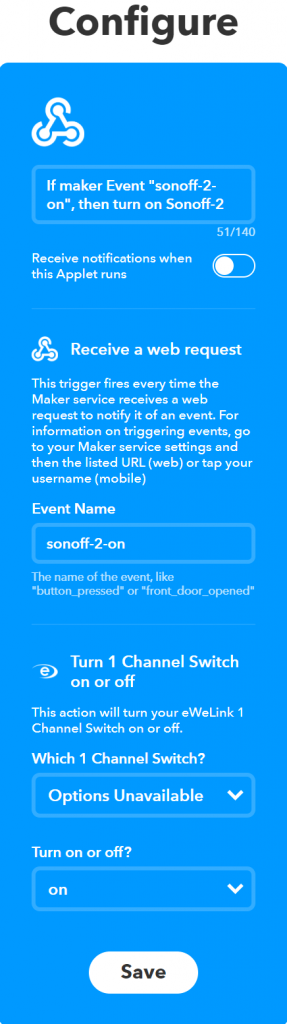 | Now all we need to do is configure IFTTT so it knows what those events are and what to do when it receives them. This is showing the ‘recipe’ I made to turn the switch on. Again check my link for information on setting up IFTTT. What we will do in this case for the new recipe is set it so that If maker Event “sonoff-2-on” then turn on Sonoff-2 This is done by making the IF condition a Web Request. So Home Assistant makes a web request with that event as specified in the above automation. The THEN part is for it to link to the eWeLink app. It will ask for your eWeLink username and password and then it will display the list of your configured switches. Here for me it is showing Options Unavailable because I don’t have any switches in eWeLink anymore (they all use MQTT). You also set the action there – either on or off. That is pretty much all you need do here. In Google Home you can also link the eWeLink app so you have voice control. The only disadvantages of this approach are using IFTTT will introduce a delay – maybe up to a few seconds – for the switch to respond and you are also dependent on someone else’s cloud server if that is a concern for you. It really is a personal preference. So lets move onto the fun part! Setting up to work with MQTT. |
Using Sonoff S22 with MQTT
So after having everyone tell me about the wonders of MQTT I thought I would set up the switches using that instead of the procedure above. The only ‘catch’ is that to use MQTT, the Sonoff needs to be flashed with Tasmota firmware which meant I needed to get a few pieces of hardware and also needed to open up the S22 so I could access the board to do it. Always fun with a mains powered device! (although safe as it was never connected to the mains while it was open)
First there is a shopping list and some software you will need to download (free)
- USB UART TTL 3.3V Converter/Programmer (e.g. CP2102, CH340G, FT232, PL2303)
- Some header pins
- Some wires to connect the pins to each other
- Either Arduino IDE or Visual Studio Code with the PlatformIO IDE extension
- Sonoff Tasmota firmware
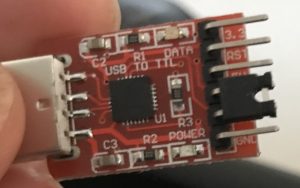 I searched for CP2102 on eBay and purchased one for around $5AUD inc postage. It came with the wires and I purchased some pins as well. The CP2102 I got didn’t have 4 wires though but I have enough computer ‘rubbish’ lying around that I had an extra wire. Just be aware you will need 4 wires.
The 6 pins are labeled from top to bottom 3.3, RST, 5v, TX0, RX0, GND
The Sonoff Tasmota Firmware is here and you want to download the source code (zip) as of date of writing this file is called v5.12.0.zip
I also needed to download the CP2102 Serial Driver as my up-to-date Windows 10 system didn’t have one. I don’t remember where I found it (Google is your friend) but the file I downloaded was called CP210x_Universal_Windows_Driver.zip
When you have downloaded the Sonoff-Tasmota firmware, you need to extract it somewhere on your computer. I put it in my documents folder in it’s own sub folder. It doesn’t matter where but you need to be able to find it.
I did try to use the Arduino IDE as it is referenced in all the tutorials and videos but it was not easy to setup, very convoluted and at the end of the day I got compiler errors that I didn’t understand and couldn’t fix and eventually abandoned. By contrast, Visual Studio Code was easy to setup and use.
To install Visual Studio Code, you need to go to the Store in Windows 10 and search for and install Visual Studio Code. When it is installed you need to run it. In the icon bar running vertically down the page the bottom Icon is Extensions. (Short Code CTRL + SHIFT +X) Click on that and then search for and install the PlatformIO IDE Extension.
Next click on File Open Folder and Navigate to where you extracted the Sonoff Tasmota firmware.
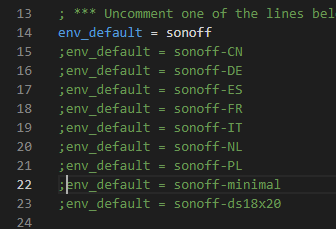
Double Click on the file platformio.ini Down near line 14 you will see a lint that says ;env_default = sonoff. You need to delete the semi colon at the front of this line so that section will then read:
[platformio]
src_dir = sonoff

; *** Uncomment one of the lines below to build/upload only one environment
env_default = sonoff
;env_default = sonoff-CN
;env_default = sonoff-DE
;env_default = sonoff-ES
;env_default = sonoff-FR
;env_default = sonoff-IT
;env_default = sonoff-NL
;env_default = sonoff-PL
;env_default = sonoff-minimal
;env_default = sonoff-ds18x20
What this does is makes sure that only the English version is built and uploaded, thus saving requires memory space.
Next, open up the file (Double-click) user_config.h
Look at Line 42 – This is the Project Name. It has to be different for each switch you want to control.
// -- Project -------------------------------------
#define PROJECT                "sonoff2"         // PROJECT is used as the default topic delimiter and OTA file name
In this case I used sonoff2 as my project name.
Next we also set the WiFi information. Navigate down to line 55. Enter your SSID and Password here and also an alternate SSID 2 and change line 55 to WIFI_MANAGER as shown. That setting enables the Sonoff to establish it’s own adhoc network you can connect to if either of the configured networks are unavailable.
#define STA_SSID1              "YOUR_SSID_1"     // [Ssid1] Wifi SSID
#define STA_PASS1              "password"        // [Password1] Wifi password
#define STA_SSID2              "YOUR_SSID_2"     // [Ssid2] Optional alternate AP Wifi SSID
#define STA_PASS2              "password"        // [Password2] Optional alternate AP Wifi password
#define WIFI_CONFIG_TOOL       WIFI_MANAGER      // [WifiConfig] Default tool if wifi fails to connect
That’s all the preparation you need. Now comes the tricky part.
Flashing the Sonoff with Tasmota
You will need to connect the CP2102 to the S22 with the wires and header pins you purchased.
The S22 opens up easily by removing the 2 screws on the back – remove those and it just falls apart. No glue or any other things to worry about. The S22 looks like this when you open it up. I have labeled the pins for easy identification.
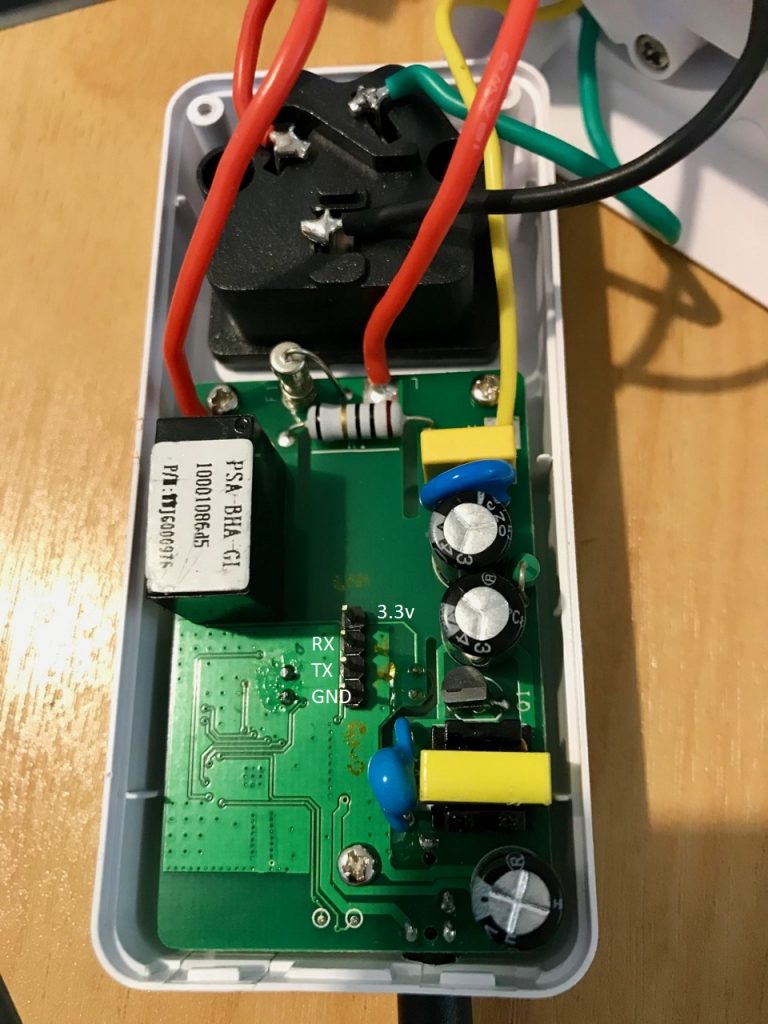
On this photo the header pins have been soldered to the board however the S22 will come without the pins. If you really want to you can solder in pins but that is not necessary or needed. I just attached header pins to the cables and then pushed them into the holes and applied sideways pressure. I attached all 4 pins to the S22 side first. I also attached the RX, TX and GND pins to the CP2102. Here’s the CP2102 again:
The 6 pins are labeled from top to bottom 3.3, RST, 5v, TX0, RX0, GND
In the photo the RX and TX are jumpered together – just remove that and connect all pins except the 3.3v pin on the CP2102
NOTE: TX on the Board goes to RX on the CP2102 and the RX on the Board goes to the TX on the CP2102. If you have them around the wrong way, no harm but you won’t be able to flash it.
When you have the pins pressed into the board and have the TX, RX and GND pins connected to the CP2102, you need to press and hold the button on the switch and connect 3.3. When you do this the computer will beep and the switch will be in programming mode. Once it’s in programming mode you can let go of the button. IF the light on the switch is flashing it means it’s not in programming mode!

When the switch is in programming mode click the side arrow highlighted above and hopefully within 30 seconds you will get a green success message and you’re done!
Setting up MQTT and Sonoff in Home Assistant
As I said, if using MQTT you will need Home Assistant to control the switches. The eWeLink app will no longer work.
First, you need to add the MQTT broker information in configuration.yaml as per below:
mqtt:
  broker: core-mosquitto
  username: your-mqtt-user-name
  password: your-mqyy-password
In Hass.io which I use, you also need to install the MQTT Broker from the Add-in Store. For other versions of Home Assistant, check the documentation for the MQQT Broker installation.
In Hass.io, I changed the anonymous flag to false and entered the username and password as shown below. Leave the port as the default port 1883
{
  "plain": true,
  "ssl": false,
  "anonymous": false,
  "logins": [
    {
      "username": "your-mqtt-user-name",
      "password": "your-mqtt-password"
    }
  ],
  "customize": {
    "active": false,
    "folder": "mosquitto"
  },
  "certfile": "fullchain.pem",
  "keyfile": "privkey.pem"
}
Additionally in configuration.yaml, you need to configure the switches. Enter that information like this:
# Switches
switch:
  - platform: mqtt
    name: "Toothbrush"
    command_topic: "cmnd/sonoff1/power"
    state_topic: "stat/sonoff1/POWER"
    qos: 1
    payload_on: "ON"
    payload_off: "OFF"
    retain: false
  - platform: mqtt
    name: "Coffee Maker"
    command_topic: "cmnd/sonoff2/power"
    state_topic: "stat/sonoff2/POWER"
    qos: 1
    payload_on: "ON"
    payload_off: "OFF"
    retain: false
I have 2 Sonoff switches as you can see above flashed with Tasmota and using MQTT.
The only other thing I changed was setting a flag so that Home Assistant got the current state of the switch when it restarted. To do that there are a number of ways but perhaps the easiest is to load the =following page for each switch in a web browser:
http://ip-address-of-switch/cm?cmnd=PowerRetain%201
You should also be able to browse to http://ip-address-of-switch in a web browser and get a Sonoff Tasmota menu.
Update August 2018
I just thought I’d do an update to this post as a few things have changed.
First thing is I decided to increase my knowledge and also consolidate my Raspberry Pi’s. I have 3 x Raspberry Pi 1B and 2 x Raspberry Pi3. It was getting to the point where I was needing another Pi 3B as for one of my uses, the software updates had killed it and I was having to reboot it every other day or even more frequently.
So I decided to get an Intel NUC7CJYH barebones kit with a Celeron Processor to which I added 8Gb RAM and a 240Gb SSD. The price for all that is around the same money as you can expect to outlay for 3 Raspberry Pi3B+’s but an exponential increase in functionality and performance. Anyway, that is not my topic here and I will do and link to a seperate post on that journey.
So because I updated to the NUC, I decided to give the NUC a static IP address but not just a random one like I had with the Pi, I decided it would be x.x.x.100. There were few consequences of that decision but one of them was I needed to change the IP address of the MQTT broker in the Sonoff switches so they could still talk to Home Assistant. I had already done 2 over-the-air (OTA) firmware upgrades on the Sonoffs and I have a stable WiFi network with one repeater that uses a different SSID. The beautiful thing about Tasmota of course is you can configure 2 different SSID’s and the switch will just pick one of them. Nice. So I updated the MQTT broker IP address in one of them and then tried to do the other. Logged into the IP address and changed the IP address for the broker and saved. That was it. Switch then became totally unresponsive. No problem I thought. I’ll just flash it again. Unsuccessfully. Totally my own fault. So I decided to purchase another 2 switches which arrived today. Tried to flash the new ones…. unsuccessfully!
It was at this point, I thought it might pay to actually read the messages on the screen! Novel thought I know. Anyway, first one I noticed was a com port error. As you know from above, we use a usb-serial adapter. I went into the device manager and was greeted with a yellow triangle with an exclamation mark. The USB wasn’t working. I then googled for a new driver, downloaded it and installed and my USB was happy again. I also noted (and this is probably what caused the problem) that the visual studio code had been updated probably in one of those windows upgrades I’ve done in the last 6 months and in fact the Visual Studio Code was only from a week ago. There was also a note in the logs telling me some options would be depreciated in the next version and how to fix them – they basically just changed the name of some keys – who knows (or cares) why. Anyway I would recommend doing that. See screenshot below. It was as simple as just replacing the board_flash_mode with board_build.flash_mode in platformio.ini. There were 2 of these when I flashed 6.1.1.7.

Next thing was I had heard some chatter about tasmota version 6.1.1 having issues with WiFi – I think when the switch is in access point mode because it can’t connect to WiFi so 6.1.1 is the latest still but I decided to download a dev release 6.1.1.7 and use that. Tried to flash one of the new switches and it would not flash still. Turns out I may have misidentified the TX and RX on the switch circuit board. I vaguely remember having problems then as well and I switched the wires over (which is what I did now as well) and it worked. SO the message is if you can’t flash it then just try switching over TX and RX and try again. Sweet! one new switch working. Next order of business was to try again with the ‘dead’ one and of course as I expected, I was able to flash that as well. Then I opened up the last (new) switch. You may or may not have heard this but Sonoff has taken to soldering the pins up to prevent people flashing the switch. Well one of the new switches had this (the other one didn’t). So I had to go out to the shed and fire up the soldering iron. I unscrewed the circuit board from the case and on the opposite side it was open so I held a header pin there and then heated the soldered side and pushed it through. Then I was able to flash it as per before. Take that Sonoff!!!
Just a few other things here.
If you get a wall of red text like this:
 | What this means is you clicked on the upload/build button without having the environment correctly set. For example, you have selected sonoff-minimal and have not also selected sonoff. |
 | See this screenshot. Make sure you remove the semi colon from sonoff-minimal as well as sonoff if you want to build sonoff minimal. Why would you want to do that? Well if you are flashing OTA (over-the-air_ you need to use the minimal image first before flashing the full version because OTA, both the current firmware and the new firmware must exist at the same time and there is not enough memory for that hence you can flash minimal and then the full version as a 2 step process. If you use TasmoAdmin, this is automated for you but it is still 2 steps. |
There’s a couple of reasons you might want to use Visual Studio Code to compile new firmware rather than flashing OTA. First sometimes you might want to use a development version and the OTA update usually only works for released firmware so if you want to use a dev version you will need to compile it yourself. Also, I don’t want to ever have to open up my sonoffs again and flash using wires so I’d rather compile my own firmware and then use tasmoadmin to flash minimal and normal via the tasmoadmin web interface.
Here is a photo of the flashing cable I used.

I simply purchased some dupont cables with header pins on one end and used some masking tape to hold them together and make a plug out of them which made it easier to insert in the holes in the sonoff board. An astute viewer will probably work out from the wiring that the pin-outs on the board I posted above have the TX-RX lines misidentified. In any case it does not matter as I said, if it does not work one way just reverse TX-RX and try again. Using that ‘rig’ it’s not too difficult to hold the pins in the board (small sideways pressure), press and hold the button with one hand and then with the other hand plug the USB end into the computer (or extension cable) and flash the board.
Sonoff Switches turning on and off randomly?
So I was having this problem with my switches. This was probably because I originally had the retain flag in the Home Assistant setup set to true. If you have that then change it to false! You will then need to either delete the persistence database (called mosquito.db found in /addons/data/core_mosquitto/ if you are using the MQTT add-on in Hass.io.
The other way is to watch the video below.
In summary, from the Switch console in a web browser, enter the following commands:
- Make sure you have set the retain: false in home assistant configuration (not a command! just make sure you do this and then restart the home assistant server)
- switchretain off
- buttonretain on
- buttonretain off
- poweronstate 3
- powerretain on
Note that steps 3 & 4 are also clearing the persistence database if you hadn’t done that and switch buttonretain on and then off.
Watch the video….
Thanks so much for your very informative article. I have a number of Sonoff switches and I have flashed all except one with Tasmota. They work extremely well with HA and MQTT! The one I haven’t is, unfortunately, in a place where it will involve a lot of ‘furniture shifting’ to get to it – and so your article proved to be very welcome, as it means I have been able to incorporate the last switch in my instance of HA (It will eventually get flashed – just not yet!). However, I have a couple of questions that do not seem to be answered in the article. I have IFTTT set up, and have successfully built the webhook applet to make the switch turn on from HA. So, my question is – do I need to make a second applet that turns the switch off? To expand on that, I have reproduced the two ‘actions’ in my automation yaml file – I’m not clear if I need a turn-on applet for the first and a turn-off applet for the second? Thanks again for your very helpful and informative articles!
Hi Mike(?)! Glad you got something out of the article.
Yes you will need a second applet in IFTTT to turn off the switch. In my example this would be sonoff-2-off as the event name and the action would be off.
Thanks David. Yes, I’ve done that – set up a second IFTTT applet and all works extremely well! Just one thing – almost as an aside – I’ve used the mdi:lightbulb icon in the card that shows the ‘switch’ (it controls a table lamp) but unlike all my other lights that use the same icon, it doesn’t change colour (from blue/off to yellow/on) when toggled. Any ideas? Is it because it is a ‘input_boolean’ entity? I’ve also set up an automation routine in automations.yaml based on the switch to turn the light on and off automatically. I was going to include it here in case anyone else is interested, as it did take a bit of messing around to get it to work, but it won’t let me!
Regards – Mike
Pretty sure it’s because of the entity. I had the same thing actually when I was using an entity picture. You can fix it but it was a bit messy. I can try and find it for you if it would be helpful.
Yes, I think you must be right. I managed to fix it by using a ‘template’ as in:
input_boolean.sonoff_switch_22:
icon: mdi:lightbulb
templates:
icon_color: >
if (state === ‘on’) return ‘rgb(255,195,77)’;
return ‘rgb(68,115,158)’;
That works! I should add that I use the custom-ui add-on which is very good for setting up screens. Thanks again for a great post. It will certainly enable me to put off the dreaded ‘furniture move’ to get to the Sonoff…….
Regards – Mike