Originally posted 2018-03-05 14:39:40.
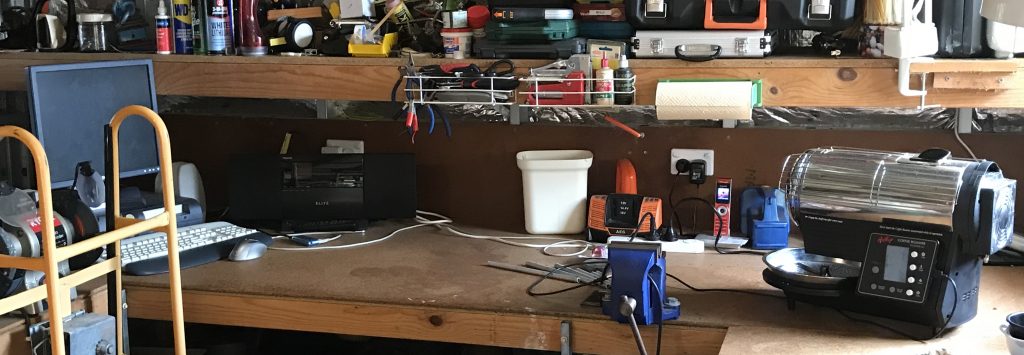
So this is my coffee roasting setup and has been for some time. I know it’s not elegant but it’s functional. You see my computer on the left and my coffee roaster on the right. I lashed out and purchased a Hottop KN-8828B-2K+ which has USB control. I have had this roaster almost since it was first released onto the market, probably late 2015.
When I purchased it, there was no actual software available for it but in my research I came across the Open Source Artisan software and thought I would give that a try. There were numerous articles on how to set the software up and how to use it with the Hottop roaster.
When I first started looking into doing this, I had a spare PC that you can see in the picture that I put out in my shed along with the Roaster to use for roasting. It was pretty fiddly to setup as with most open source software, the functionality is excellent but jargon and a lack of good documentation means a lot of experimenting and trying things out to see what works for you.
I installed version 1.2 which I downloaded from here. Note I was originally using a much earlier release but last week decided to start using it on a Raspberry Pi I had lying around.
The installation software I downloaded was called see artisan releases here (Note: this is updated regularly so the current download will be a different name) As can be gleaned from the title of the file, it’s made for the Raspberry Pi running Raspbian Jessie. The latest version of Raspbian is based on Stretch instead of Jessie so I downloaded the FULL (note: NOT Lite) version of Stretch with the Desktop/Pixel graphical environment. I am going to assume here that you can setup a Raspberry Pi with Raspbian ok? The download for Raspbian (replaced by Raspberry Pi OS now) is here. You will find it takes a long time to download the image depending on server load and their limited bandwidth. I use Win32DiskImager to image the SD-Cards for my Raspberry Pi and if I need to wipe a card, I use the MiniPartitionTool Wizard. Both are free to download and use. You should also create an ssh file in the boot partition to enable SSH before you remove the SD-Card from your computer and boot the Pi up for the first time. I am assuming here you know how to do this and full information is available on the Raspberry Pi site.
There is no reason why this wouldn’t run on and Raspberry Pi however from my past experience, to run the graphical desktop Pixel, it’s a good idea to use a Raspberry Pi 3B in my opinion. I use one of these for this and also the resource hungry Home Assistant but I use the version 1B models for other simpler applications. Raspberry Pi’s ARE addictive! (I have 5, 3 of which operate 24/7/365 and the other 2 are for tinkering or roasting coffee 🙂 )
Installation instructions are found here. They are pretty sparse to be honest.
There’s 2 ways to install it. Either in the file manager, double click on the file artisan-linux-1.2.0_raspbian-jessie-py2.deb or you can install it in PuTTY or some other shell program by running this command:
sudo dpkg -i artisan-linux-1.2.0_raspbian-jessie-py2.deb
You should then see that you have an icon for Artisan in the Accessories Menu.
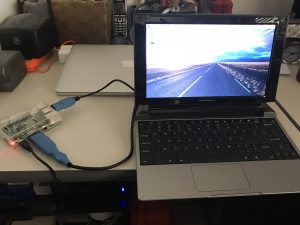
Here you can see my Raspberry Pi on the left hand side connected to an old Motorola Screen – in Raspberry Pi world known as a Lapdock – it was made for an old motorola mobile phone, was deeply unpopular for that purpose and is now widely loved by people who wand a cheap screen for their Raspberry Pi (including a keyboard and trackpad)
In actual fact, I also enabled the inbuilt VNC program so I can use the Raspberry Pi to run my Hottop ‘headless’ meaning all I plug into the Pi is the power cable and the roaster USB cable. Then I can access the Raspberry Pi using VNC (it has a wireless LAN card in the Pi) and I can control it from my office!
Just to back up a bit…. I had a running Artisan software on the old PC in the shed. Now apart from wondering if I *could* use a Pi to control it, I had started having problems with the PC and I was throwing too many (read ANY) beans out as the rosat would get to a certain point and then the roaster effectively shut down. I also could not access the menus properly on the PC either so I decided to try and get the Pi to work.
Once you have installed the software and can access the Pi either with a monitor/keyboard/mouse or remotely via VNC you need to configure it to talk with the hottop.
This used to be a lot harder/complicated to do than it is now. You used to have to go through a procedure to configure events and buttons on the screen. There is a pretty good tutorial on doing this here so I am not going to repeat that here. Suffice to say that the makers of the Hottop slung some cash at Artisan’s developer and the Hottop is now supported natively out of the box now! I still like configuring the controls for the roaster by adding extra buttons for easy access and easy use.
The other thing you will need to do is set up alarms. This is optional but it allows you to completely automate your roast! Great article on alarms here from Artisan developer.
So what I did was I watched a few videos on YouTube to get a feel for how people typically adjust their roast with the Hottop to work out a ‘recipe’ for how I wanted to do my roasts. One of the things I didn’t really like was the ‘time’ based actions you can actually program into the roaster itself – I preferred to use the idea of performing certain actions when the beans were at a specific temperature. This pretty much means in winter or summer I can roast the beans with the same alarms without having to give any regard to the ambient temperature. It’s fascinating to see how consistent the timings of the roasts are year round.
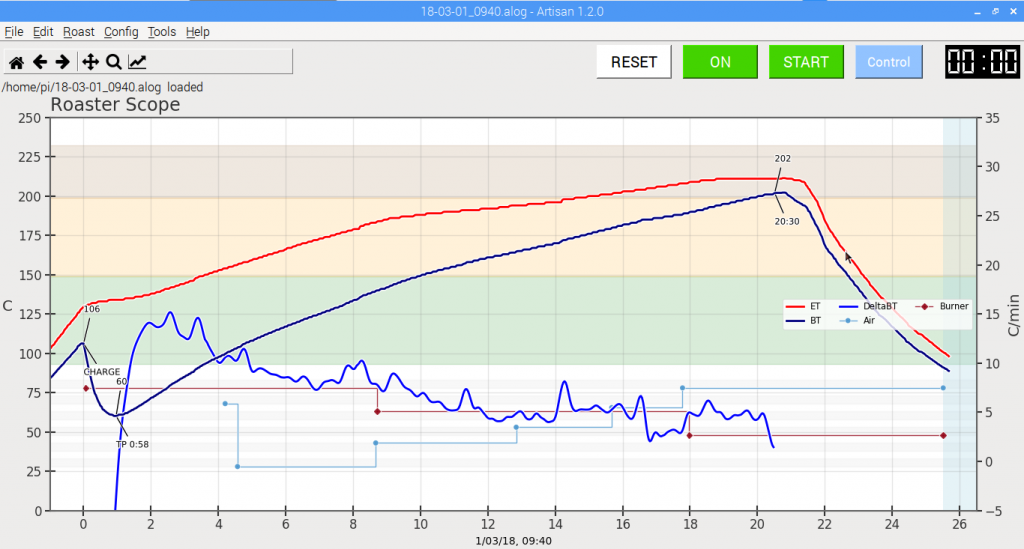
So here is my ‘patented’ roasting profile. All temperatures are in degrees Celcius.
| ID | IF Alarm | FROM | TIME | Source | Condition | Temp | Action | Description | Comment |
|---|---|---|---|---|---|---|---|---|---|
| 1 | Start | BT | Above | 98 | Popup | Load Beans | Prompt to load beans when 98°C | ||
| 2 | Charge | BT | Above | 99 | Slider Air | 75 | After TP when get up to 99°C fan on 75% to remove moisture | ||
| 3 | 2 | TP | 0:20 | Slider Air | 0 | After 20 Seconds, turn fan off | |||
| 4 | TP | BT | Above | 139 | Slider Burner | 70 | Turn Heat down to 70% | ||
| 5 | TP | BT | Above | 139 | Slider Air | 25 | Turn Fan on 25% | ||
| 6 | TP | BT | Above | 164 | Slider Air | 50 | Turn Fan on 50% | ||
| 7 | TP | BT | Above | 179 | Slider Air | 75 | Turn Fan on 75% | ||
| 8 | TP | BT | Above | 189 | Slider Burner | 40 | Turn Heat Down to 40% | ||
| 9 | TP | BT | Above | 189 | Slider Air | 100 | Turn Fan Speed to 100% | ||
| 10 | TP | BT | Above | 201 | DROP | End Roast | Drop Beans and commence Cool cycle | ||
| 11 | 10 | DROP | 5:00 | COOL END | End of Cooling | End of Cooling |
So basically, when roaster gets to 100°C, prompt to load the beans in the chamber. The bean temperature (BT) will then immediately drop down to around 60°C and will then start coming up again. When it starts rising, this is the turning point (TP). After the TP, when it gets above 99°C, turn the fan on 75% to remove moisture for 20 seconds and then keep roasting. At 139°C, turn fan to 25% and heat to 70%; At 164°C, turn fan to 50%; At 179°C turn fan to 75%. First crack is generally around 184°C and at 189°C I turn fan to 100% and heater down to 40% the idea being I want the roast to gradually coast up to 201°C where I drop the beans, finish the roast and commence cooling. After 5 minutes of cooling, stop.
This is just what I do here – you make your own roast and conditions but maybe this helps you. As I said, All I am doing now is plugging in the power and the roaster and running it via VNC from my office, running out to load the beans. I hope you have found this interesting.