Originally posted 2018-02-20 14:36:19.
 This article is an adaptation of an article on the home assistant community forum. The forum post was great but like a lot of posts, everything makes perfect sense in retrospect and often some of the intermediate steps are unclear even when you know what you are trying to achieve. This is a comprehensive step-by-step approach. For some us us (like me) Linux is not a fluent second language and I need more than just general directions to work things out sometimes.
Note: This is only for the old ResinOS installation. There is currently no way to run the new HassOS from a USB stick.
Update: 27th August – see my new post here to use Hass.io with a USB boot.
Why run from a USB Stick?
One of the issues many people find when using SD-Cards is that they are easily corrupted and damaged. With the Home Assistant system, this seems to happen more often. Probably the 2 most common problems with Home Assistant are either the SD-Card or the power supply. By using a USB stick instead of an SD-Card often these problems are mitigated.
Power Supply?
Oftentimes the root issue is the power-supply. The Raspberry Pi Foundation recommends using a 2.5amp power supply for the Raspberry Pi 3B. In this tutorial I am going to be installing the Hassio variant of Home Assistant which is essentially an appliance and there is very little access to the command line and command line tools you might be familiar with under Linux. You can’t for instance install packages and make the Pi do different things. The Hassio variant does come with add-ins that you can install to add functionality. There are some advantages to this approach – first, you don’t need to worry about updating the system when there is a new dependency. For instance, python 2.4 is now depreciated in Hassbian (another variant of Home Assistant for the Raspberry Pi) and in fact python 2.4 will be unsupported from the next release. Advice is to install a whole new Hassbian using the latest Raspbian Stretch which includes python 3.x support built in. Now that may be fun times for someone who loves tinkering all the time with Linux but some of us just want stuff to work! Hence, Hassio which automatically keeps itself and all these dependencies up to date at the cost of being less flexible for a ‘power user’
None of which has anything to do with the power-supply! A lot of people will try and save money and will try and use any micro-usb charger they have lying around. As I said the power requirement for the Raspberry Pi 3B is 2.5amp. You really need to shell out a few dollars on getting a good power supply otherwise you will have no end of trouble – random re-boots, system even not starting. Trust me when I say, if this is happening all the time then you are doing a lot of damage to the SD-Card without necessarily being aware of it. I found a good 3amp supply on eBay for around $15 delivered. You only need a 2.5 amp supply but you won’t hurt anything by getting a 3amp one – just make sure the voltage is 5v and the amps will take care of themselves.
SD-Card?
So yes, the SD-Card is the other weak point of the Raspberry Pi system.
I actually purchased for $24 a ‘noobs’ SD-Card with a variety of operating systems pre-installed on it when I got my Raspberry Pi from RS-Components. I never actually used it as supplied as I just flashed it with Hassio anyway but it was expedient at the time. It was also a poor choice. What I was finding was that the card, a 32gb class 10 card was not up to the job. I was finding that every couple of days, sometimes even daily, the system would be working but I was unable to access certain menus or if Hassio was updated, I could not install the update, or if I went into the configuration to add another component or change the way something looked I couldn’t. (Just by way of an update on this – I ran h2testw v1.4 on this Noobs card today and it passed with flying colours.)
SD-Cards do have a limited life – only a fixed number of read/write cycles possible and Home Assistant is very database intensive with a lot or data continually being written to a sqlite database on the card. Some people counter this by using a mariaDB and storing it on a different location than the SD-Card. Nice idea but it’s not that easy to do this with Hassio as you don’t have access or an ability to map an external drive where you can put that database.
 It’s also apparent that not all SD-Cards are created equal and there are a lot of dodgy cards around, some counterfeits etc so it’s best to buy from a reputable vendor with good feedback on eBay or even a bricks and mortar shop. I have heard good and bad things about Sandisk and also Samsung EVO Plus cards. Whatever card you choose, run it through h2testw v1.4 to make sure it is genuine otherwise there will be tears before bedtime in the near future when it fails. I got a couple of 32gb Samsung EVO Plus cards on eBay that were genuine and cost me $10 each. Happy about that. I then setup a clean install of Hassio (see the Home Assistant Site) and restored a snapshot backup and I have not had any kind of unpredictable crashes or behavior with Hassio since – I can’t believe it either! A quality SD-Card makes that much difference.
Raspberry Pi v3B?
Ok just to round this out before we get onto installing and running from a USB stick. A common question relates to what hardware to use. Hassio is fairly resource hungry and images are only provided for the Raspberry Pi 3B. Hassbian, another variant will run on even a Pi Zero I think and I did originally use a Pi v1B with the now depreciated all-in-one installer. Suffice to say, $35 is pretty cheap for the top of the line Raspberry Pi v3B and I would not recommend anything else. Get one of these and a 3amp power-supply and you’ll be good to go.
Running Home Assistant from a USB Stick instead of an SD-Card
Well we finally got right down to it. Here we go. Again, this article is a modified version of a forum post at the Home Assistant forum that I linked to above.
One of the other advantages of the Raspberry Pi 3B is that it is now possible to configure it so that it will boot from a USB stick without needing to use a SD-Card at all once the OTP (One-Time-Programable) memory has been set. This is described on the Raspberry Pi Foundation website here.
Essentially, you will need to have an installed Raspbian Stretch image on an SD-Card. You then need to run this command from a terminal program to install the code that will program the OTP memory. Here is the command:
echo program_usb_boot_mode=1 | sudo tee -a /boot/config.txt
I use PuTTY for this. Although not specific to this, I have previously written about PuTTY here. When you have done this, reboot the Pi by running this command:
sudo reboot
When the Pi has rebooted, run the following command from the terminal to verify the OPT memory has been programmed correctly:
vcgencmd otp_dump | grep 17:
Examine the output. It should look like this:
17:3020000a
You can then edit /boot/config.txt and remove the last line that says:
program_usb_boot_mode=1
I would use nano to do this.
Next step is then to use Etcher or Win32DiskImager to write the Hassio image file you downloaded from Home Assistant website. (If you have not already downloaded this, do that now from here) I have put the direct link to download it but you can also read here about Hassio – just make sure you remember we are installing Hassio on a Raspberry Pi.
I used 32gb Sandisk Cruzer Blade for mine and it seems to work perfectly. No reason you couldn’t use a USB rotating drive or even an SSD although I have not tried this myself. Just a note regarding Etcher. I have had one successful experience using Etcher. It has some advantages in that you can burn an image file to the device without unzipping it first. I personally find that after the image has been written that Etcher just hangs up and never seems to finish correctly. For this reason I much prefer unzipping the image and using Win32DiskImager. Both tools are readily available and free. I have not looked for or investigated a Mac equivalent (I know etcher has a Mac variant). I also find that my computer (windows 10 based) is not too fussed about reading an SD-Card once flashed either and sometimes I need to unplug the SD-Card Reader and plug it in again – but in this case, we are using a USB drive so… If you do use etcher, (and it works correctly) it will automatically eject the drive. If using Win32DiskImager, eject the drive when done. Whichever, unplug the USB Drive and then plug it back in again (give Windows 10 seconds first). You should find that Windows will recognise the drive now.
Bear in mind that the image you have burnt to the USB actually contains 4 different partitions – only one of them is a FAT partition and readable by Windows. You will see it labeled as resin-boot. You can edit some files in here however, I think it is simpler and less problematic if you do this with the USB plugged into your raspberry Pi using PuTTY. But DON’T DO THIS YET!!
The thing you need to do right now is download Gparted which you will need to use to edit the Linux Ext4 partitions of the USB stick. I downloaded the version called Stable directory (.iso/.zip)(for i686, i686-pae and amd64 architectures) (I did have links here for these but you’ll have to Google it. The links tend to go offline and down so I don’t like getting 404 errors)
This downloads an ISO file which I then burnt to a CD using Nero. I believe Windows 10 has built in CD creation software anyway. At the end you need to have a CD with Gparted on it that you can use to boot your computer.
To make the computer boot from the CD and not a Hard Drive as it normally does, I needed to press Del key as the computer was booting and set the CD drive as the first boot device. The computer then booted from the CD and I was able to bring up this screen showing the partitions on the USB device which I plugged into the computer after it had booted. There were some options (lots of options actually) as Gparted booted and I just used the defaults. Eventually I came to a screen with some icons and I clicked on Gparted Icon to bring this up:
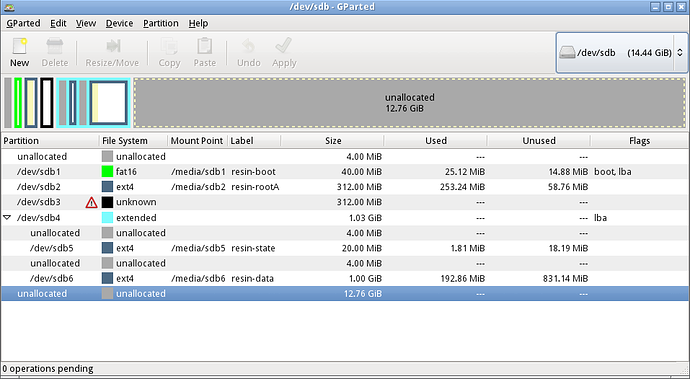
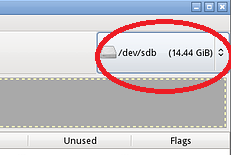 Once in this screen, you will need to select the correct device so that it shows the USB partitions. The screen-shot above is showing the USB partitions already.
If you look under the label, you can see resin-boot, resin-rootA, resin-state and resin-data partitions.
The resin-boot partition is the one you can see in Windows (You can see the file system listed is fat16 whereas the other linux partitions are ext4)
What you need to do in here is to increase the size of the /dev/sdb4 to around 4gb according to the instructions in the original post however you can make this as big as you like (I made it all but 4gb of available I just rebuilt the USB and this time I used ALL available for this partition instead of leaving some unallocated) You have to do this before you can increase the size of /dev/sdb6 from 1gb to whatever is left (I maxed this out to take all available as well on my rebuild). To resize, just click on the drive and then use the Resize/Move button and use the slider to increase the size. Then make sure you apply the changes!
This is where I diverge from the instructions on the forum. If you can find a way of doing this on your PC or in Gparted good luck to you as I could not find any way to edit the files I needed to edit. (Note: in Gparted, there is a terminal icon and you can use the terminal to edit the files. I did this on my rebuild. Only thing to be aware of is that the name of the partition might be different in Gparted compared to what it will be when you insert it in a Raspberry Pi) You can edit the files in resin-boot as it is a fat16 partition but there is no way in Windows to edit the ext4 files in resin-rootA that I could find. No matter as it’s fairly easy to do this in PuTTY.
So.. put the SD-Card back in the Raspberry Pi and let that start up and then you can plug in the USB stick – NOTE: DO NOT let the Pi boot from the SD Stick – don’t plug it in until you are connected via PuTTY.
Once in PuTTY, execute this command:
fdisk -l
You will see this screen:
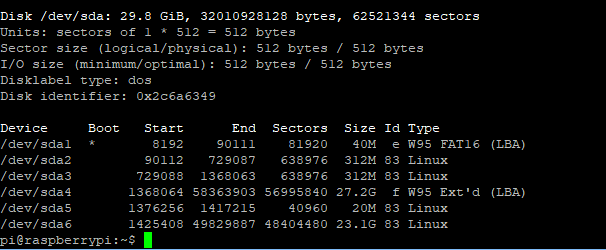
We then need to execute these commands (note the device name used in the commands corresponds with the device names in the screen-shot above) The USB drive is the last drive that was listed.
sudo mount /dev/sda1 /mnt
cd /mnt
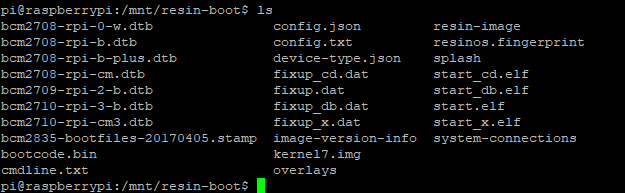
ls
So here we are mounting the first partition of the USB stick which is actually the fat16 partition resin-boot we could have seen in Windows. Here is the file listing of that partition:
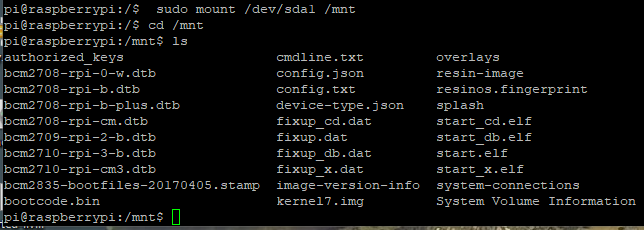
A couple of things to notice here. First is there is an authorized_keys file – I actually copied this file here when the USB was in my computer after I had imaged it with Win32DiskImager. For information about this file and what it is see my previous blog post here. Additionally, having this file here lets me run debug mode of Hassio
Second, there are 2 files here we need to edit cmdline.txt and config.txt. First cmdline.txt. Issue this command:
sudo nano /mnt/cmdline.txt

We need to change the line so it reads root=/dev/sda2 as per the above screen shot.
sudo nano /mnt/config.txt
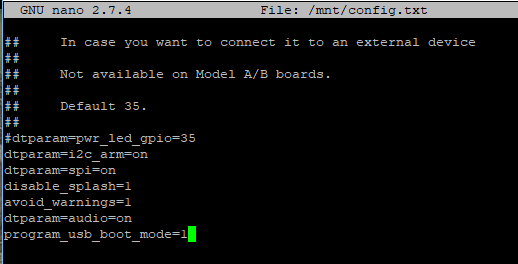
We need to add that last line program_usb_boot_mode=1 as shown.
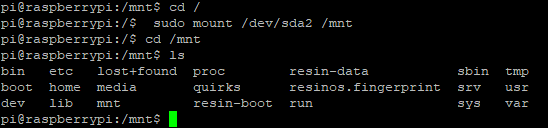
Next, we need to map the ext4 resin-rootA
sudo mount /dev/sda2 /mnt

cd /mnt

ls
If we then change directory to the resin-boot folder:
cd resin-boot

ls
We need to edit those same 2 files here as in the previous folder.
Make sure you include the path in the commands as shown:
sudo nano /mnt/resin-boot/cmdline.txt

sudo nano /mnt/resin-boot/config.txt
Make the same changes in these files.
Finally, shut down the Pi and remover the SD-Card and reboot.
When I did this I plugged the Pi into my screen and it almost immediately came up with the Home Assistant logo and I was able to connect to http://ip-address-of-pi:8123 and Home Assistant was running perfectly and I could then restore my snapshot and job done.
What about the new HassOS?
When I rebuilt my system yesterday, (July 2018) I thought I would see if I could install the new HassOS version of Hassio which is not at the RC1 level. I was unsuccessful. The ResinOS above has a resin-boot partition but I was unable to mount any partition other than the /dev/sda1 which did contain the files but I could not access any of the other partitions even in linux.
At the moment a USB install is a no-go for HassOS. I believe that eventually, the SD-Card boot will be like a ROM and there won’t be read-write cycles to the card and a USB will be able to be used for the data partition. I’ll add that information to this post or in a new post in the future.
Hope this helps you. Make a comment and let me know.
August Postscript: I have now done a new blog post on how to run Hassio off a USB stick. It is not using HassOS but is using Raspbian which of course will be updated and supported going forward unlike ResinOS which is end-of-life for Hassio. You can see my new article here.
Great write up. A lot of good info and pointers.
I have one question, how is running from USB stick better than SD card? Both are flash memory. Is it a NAND vs NOR issue?
Hi and thanks for your comment.
I don’t necessarily believe either is better than the other for the same reason you said – both are flash memory. Anecdotally some people prefer USB after multiple corruption of their SD-Card installations.
I had some issues with a SD card supplied as an official RPi SD-Card reinstalled with noobs but it gave me a lot of trouble with home assistant locking up every day or so. Switching to a Samsung EVO Plus 32gb card and I had no issues at all with that setup.
I went through setting up a USB stick and just recently started using that to see how it went. Some people think a USB is faster than an SD card. All I can say is I have not noticed any difference between tham at all.
When Home Assistant Devs release the new Hassio-OS to replace Resin-OS, I’m planning on using a real SSD drive for Home Assistant.
Thanks again for your comment and question.
One other thing…. it doesn’t seem possible to have the database in a seperate location and this is where the corruption seems to happen as the Pi reboots or restarts and it’s in the process of writing to the card. Hassio on the RPi does not seem to have a way of moving the database somewhere else.