Originally posted 2017-09-22 12:07:35.
Home Automation
The next logical step with Home Automation and my Google Home is to integrate some LED lights so I started doing some research and came across the Limitless LED lights.
As it turns out, I didn’t look far enough and ended up with a few challenges getting everything working. Even posting on and searching forums I found that there was so much assumed knowledge and jargon that it was difficult to get to where I needed to be. So this post chronicles my journey into Home Automation nirvana (for now and for LED Lights integration anyway). The old adage – Question: “How do you eat an elephant?” Answer: “One bite at a time” applies here.
Components Purchased Limitless LED
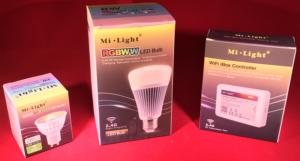 I purchased 2 of the RGBW/WW/CW Full Color and Dual White LED Light bulb for USD$19 each and also 10 of the RGBW/WW/CW Full Color and Dual White GU10 LED Lamp for USD$130. The third item I purchased was a WiFi Bridge for USD$17. I needed the bridge to be able to control the lights with my iPhone (bite 1!). If you have no interest in automation, you can buy a remote control instead. Be careful with the remotes as there is a different remote for a different light. The phone app enables you to select a different remote depending on the light types. With shipping, the total cost of my order was USD$200.56. (The cost of the bulbs and bridge has come down since I purchased by a few dollars).
Configuring the Bridge
Step 2, once all the lights arrived (around 10 days) was to get the lights working, one at a time with my iPhone. First step is to find the Mi-Light App on either iOS iTunes store or Android Google Play store. I use iOS so used the iOS app obviously. When you buy the lights you will get an email linking you to a pdf file with instructions for configuring the bridge and lights. Ignore them. The supplied documentation is garbage and useless unfortunately. (The PDF is for v4 bridge which is obsolete and doesn’t apply to the v6 bridge I purchased and now available) The support is also less than useful. It is worth noting that the Mi-Light 3.0 app is currently the only App that works with the version 6 bridge so don’t waste your time with the LimitlessLED app!
Also worth noting is the Mi-Light support site. Limitless LED is the same as Mi-Light – everything I got from Limitless LED was actually branded as Mi-Light. On the bottom of the support page there is a video that gives the correct information about configuring the bridge and the lights. The ‘manual’ that comes with the bridge is also correct.
I recommend watching that video!
Now I did have 2 problems. Firstly, my network has MAC filtering which is set to prevent new WiFi devices connecting to the network. Unfortunately, there is nowhere on the iBox/Bridge that tells you what the MAC address of the iBox is so you don’t know what MAC address to allow. It took me a while to realise that this was why I could not successfully connect my iPhone to the Bridge. My router should have also given me an unsuccessful connection from the specific MAC address but for some reason didn’t so I ended up turning off MAC filtering. The iBox then connected right away and in the app it then tells you the MAC address of the box. Additionally if you browse to http://ip_address_of_box/ you will be able to connect to the web server in the iBox and it will tell you the MAC address. I then white-listed that MAC address and turned on MAC filtering again. Job done.
Second problem was a bit more puzzling. I had temporarily used a USB power supply from some old component I had used at some time – it was rated for 0.5mA so that met the specification. Although it powered the bridge and I could connect to the web server it would not connect to any of my lights. My ultimate plan was to plug the iBox into my router anyway so I connected it up to that and then to my astonishment, it connected to the bulbs immediately. Yay!! I was then able to control brightness, colour, colour temperature perfectly. To be fair, this was included at the very bottom of the troubleshooting section of the instructions for the v4 bridge (that are otherwise useless as I mentioned above). Can’t imagine why I didn’t think to look there 🙁
Automation with Home Assistant
Next step then was to try and go down the path of getting these to work with Google Home. There seemed to be a few steps along the way to make this happen.
Prior to the version 6 bridge (iBox2), it seems that it was ‘easier’ or so people tell me – although it’s hard to know as any question I have asked is like a maths problem – you know the problem and someone gives you the very last step in the solution assuming you know and understand all the steps in between. When you read a lot of the technical information it’s like it’s written in fluent Swahili unfortunately – or maybe it’s in gibberish. I can’t work out which.
Until a recent change made with the Google Assistant/Google Home, it was possible to configure the iBox Bridge using another piece of software called HAbridge and set that up so that it emulated a Philips Hue system. Google Home would then see your lights as a Philips Hue and Happy days, you were up and running and saying “Hey Google Turn on my lights”. Unfortunately, Hue no longer supports ‘local’ connections and you have to go through a Hue account which, mother of all shocks, won’t talk nice with HAbridge.
There is a page on the Limitless LED site that lists the available Apps and also a Developer page. See above paragraph! In any case, after a lot of googling and reading on various forums it seemed that the flow of information was as follows:
Google Home –> IFTTT –> Web Command –> Home Assistant –> Bridge
So I’m going to bet this is all gibberish to you right now.
Essentially, Google Home has a built in integration to “If This Then That” or IFTTT. But this is the final bite of the elephant so I’m going to get to this bit as the last step. Suffice to say for now that I can say to Google Home “Hey Google Turn on my lounge lights” and it will send that to IFTTT which will say – Hmm…. command “Turn on my lounge lights” received (IF This) that means I have to (THEN) send this web command (THAT) to this web address. (This web address being a web server on my internal network that can control my lights – in this case Home Assistant.)
So as of now, I have the 2 endpoints worked out, I know how to get the IFTTT working (fingers crossed), I have the bridge working. I now need to get the Web Command and Home Assistant going!
Setting up Home Assistant
In my reading and looking around and also linked in the Limitless LED Apps page was a link to Home Assistant software/server. It was easy to miss on that site because even though it was at the top it was effectively buried in all other kinds or gibberish….. or maybe it’s just me? Nah!
Anyway, head on over to Home Assistant and go to their getting started page.
I had a Raspberry Pi lying around at home that I wasn’t using so I picked that option. A Raspberry Pi is a good choice because Home Assistant needs to be running 24/7/365 for it to work as a home automation server. Long story short, instead of selecting any option here, click on Docs in the menu bar. Then under FAQ in the right hand column you will see under Installation, a link to Raspberry Pi All-in-One. Now I only have a Raspberry Pi 2 but if you have a Raspberry Pi 3, The Hassbian option would be faster I believe as it will lead you by the nose to install the Raspbian and Home Assistant Server with the one image. Having a Pi2 means I used the All-in-one installer.
To be honest, it took hours to download the latest Raspbian (The Pi Foundation servers are S-L-O-W) it then took all day to install Home Assistant. The instructions on that page are excellent and complete. If you follow them you should be up and running.
One thing, when the installation had been running for a LONG time (6 or so hours at a guess) my Putty session times out/closed I was somewhat bemused as there was no message in putty to say the Pi was rebooting. Anyway, when I restarted the Putty session, I was able to navigate to http://your_PI_IP_address:8123 which is the Home Assistant interface/control panel.
Nice!
A shout out to BRUH Automation here. Excellent Youtube videos.
Getting Home Assistant to see LimitlessLED Lights
After a LOT of screwing around, I finally was able to work out how to do this.
The configuration file for Home Assistant is stored (on the Raspberry Pi) in the folder
/home/homeassistant/.homeassistant
Navigate to this folder in Putty or WinSCP or however you ‘normally’ connect to a Linux system. You will need to edit the file configuration.yaml
The easiest way is to issue the following command from that folder (Using Putty):
sudo nano configuration .yaml
Copy and Paste this text to that file (I put it down the bottom below the Text to Speech section, above the includes section.) Make sure you put in the IP address of the iBox2 Bridge in place of xxx.xxx.xxx.xxx (Note: I think the exact indenting is actually quite important. Certainly a lot of people can’t seem to make this work.)

You could also put the content into a lights.yaml file and then have a line saying:
light: !include lights.yaml
I did try doing that but got errors. Looking back now, I think I erroneously included the light: entity in the YAML file as well which may be why I got the error. In any case, it’s not necessary to set up a different file right now. (Update: 2017-10-11 I did just do this and it is working)
You can see here that I have 4 groups defined – Lounge, Dining, Office and Spots.
Once you re-start Home Assistant, you should see them when you go to the Web Interface of your Home assistant http://ip_address_of_pi:8123 Note: you must re-start Home Assistant by either rebooting the Pi or selecting the menu option (under configuration) to do so.
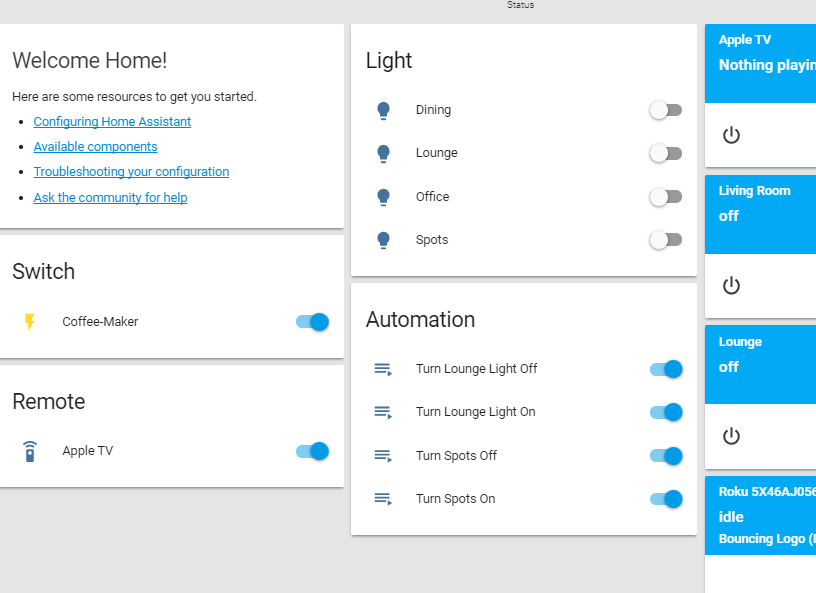
Here you can see the 4 zones under Lights in the middle at the top. It has also picked up my Apple TV, Chromecast, Google Home and Telstra TV (Roku) shown cut off on the right. It also picked up my Samsung TV not shown in this screen grab. You can also see it has my Coffee Maker switch on on the left hand side.
I was very excited that clicking on the on/off button did indeed turn those lights on and off!
Also the Automation is showing in the middle at the bottom and you can see the 4 automations I have created. I’ll show you how to add Automation next.
Setting up Automation with Home Assistant and LimitlessLED
UPDATE 23/03/2018
Just a note here to make an update. I blindly followed some of the online guides and set up automations when I really didn’t need them. An automation is used to specify something to happen when there is a specific trigger and optionally under certain conditions. To control your lights, this is actually helpful but in the context of controlling lights with Google Home it’s not actually all that relevant and in fact even though in this article and the following one I set up automations, you will note that I don’t actually USE them for anything! I am going to do another article specifically on Automations with Home Assistant here.
First, and to make some kind of sense of the gibberish, watch this great video from BRUH Automation as it cut through and helped me a lot.
So this goes all the way to the automation step but covers setting up the automations. It’s worth watching.
I’ll show you how to make 2 automations. Note that if you just want to use Google Home to turn lights on and off, you don’t need to create automations. You will however find doing this helpful when you come to do the JSON commands with the web request at IFTTT.
First Turning the Lounge Lights on.
First, in Home Assistant, Click on the Configuration menu 1/2 way down the left column. From that select Automation and click on the yellow cross (+) in the bottom right corner of the screen to add a new automation. From here you need to add a Name, a Trigger and an action. See below for my automation for this.
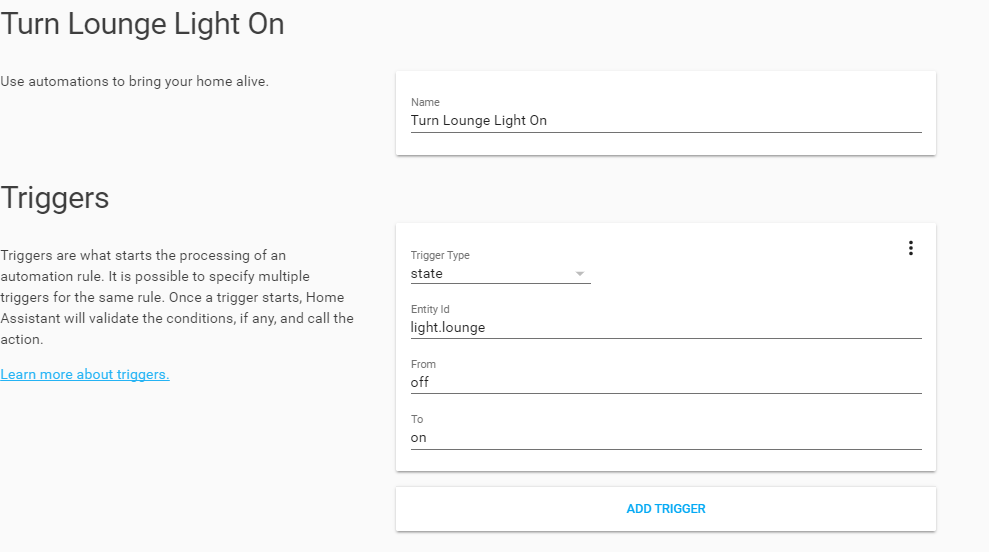
So give the Automation a name (Turn Lounge Light On), Set the Trigger to state (the default), Set the Entity ID (light.lounge) and From (off) and To (on). Then set the Action as per below. The condition is blank. I do have a condition set to turn my lounge room lights on 60 minutes before sunset but conditions are optional and can be easily added later when you understand home assistant a bit more.
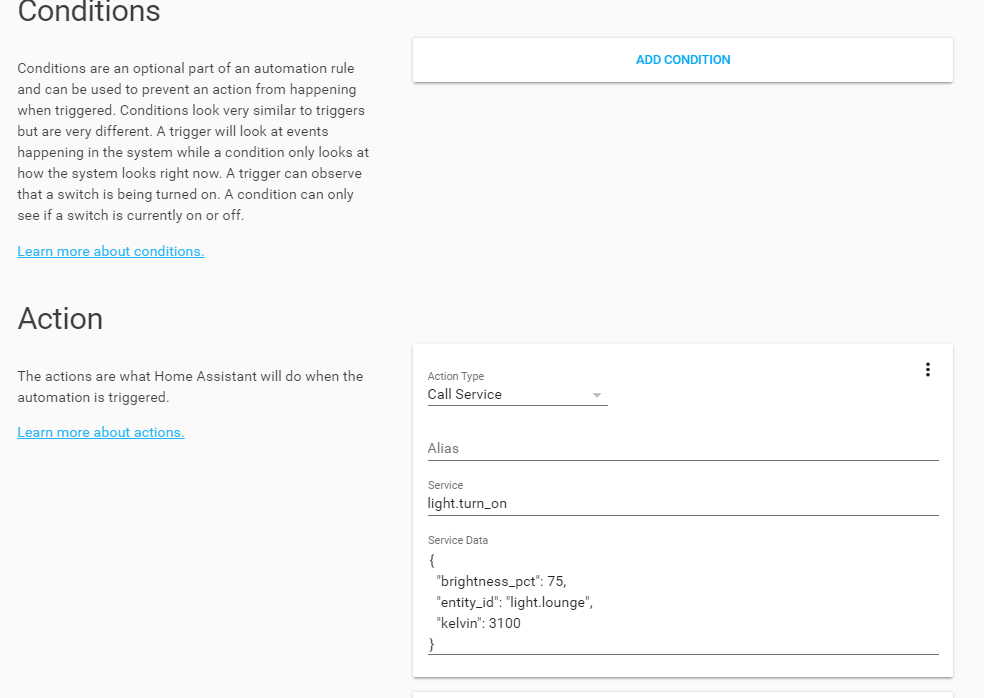
The Action Type is to Call Service, Service is light.turn_on and the service data is as shown. Make sure you set the entity_id. You can also set a host of other things but you’ll need to do some reading and testing with those. The Service data is exactly the same JSON service data you will use with IFTTT later so it’s worth getting the automation working and manually triggering it to test it’s working. Then it’s just cut and paste later. The trick here is to get all the individual bits working one at a time and then it should work as expected.
For the turn off automation, the Trigger would be from On to Off (reversed from above) and the Service called would be light.turn_off and only the entity_id is needed in the curly brackets. If you watched the video as I recommended, this should all be very clear.
So looking at our information flow from above, we’re really getting there now.
Google Home –> IFTTT –> Web Command –> Home Assistant –> Bridge
Next part to work on is the Web Command –> Home Assistant. We’ll cover this in our next article here.