Originally posted 2017-09-22 13:24:52.
Home Automation
This is Part 2 of our Home Automation article following on from Part 1 here.
Home assistant allows you to use a URL as a command to trigger actions. This can be either on your home network or on the Internet. So the next step we need to follow is to get a Web command from a browser to trigger our Home Assistant and turn our lights on or off.
This is more complicated than it sounds but paradoxically easier as well.
A couple of things we need to bear in mind. First, to access our Home Assistant Server from the Internet it needs to be accessible from outside our home network. Second, we need to be able to do that in a secure way.
To do this I’m going to use 2 free tools.
Setting up DuckDNS and LetsEncrypt SSL
First is duckdns.org. This is a free dynamic DNS service that enables your server to have an IP address on the Internet so you can access it when you are not connected to the network over the Internet. There are a couple of ways you can go here. You can either set up your Router so that it automatically sets the public IP address to your ‘domain name’ or you can set this up in your raspberry Pi so that the Pi will have an IP address on the wider internet.
I think I’m not explaining this very well.
When your router connects to the Internet, it is issued an IP address by the service provider. Unless you have a business plan or pay an extra fee per month, this IP address generally changes every time your router reconnects to the Internet, which if you live near me, could be 4 or more times per day. (Thanks Telstra). So if I want IFTTT to connect to my Home Assistant over the internet to trigger my lights when I ask Google Home to switch them on, then IFTTT needs to know what my IP address is. So with a service running on my Pi or on my Router, a company like duckdns.org assigns a domain name to ‘me’ like mydomain.duckdns.org and every time my router reconnects, the router syncs my NEW IP address with that domain name so that IFTTT can still find my Home assistant; or if you are running the update client on your Pi, the Pi needs to update duckdns with your current whereabouts.
There is actually a great tutorial on Home Assistant that will guide you through doing this. I don’t need to set this up on my Pi as my router talks directly with duckdns itself. My friend at BRUH Automation also has a great video.
The second part you need is to install an SSL certificate on the Raspberry Pi so that your communications or the communications from IFTTT which will contain your Home Assistant password in clear text cannot be intercepted by a malicious third party so that everything remains secure. There is a free service called LetsEncrypt that does this. The above tutorial and video also step you through installing this certificate.
OK. I have now installed LetsEncrypt on my Pi. It took forever – maybe an hour and looked like it had hung at one point. Just be patient. That tutorial is excellent. Just remember after you edit your Home Assistant configuration that you will need to restart home assistant. I also strongly recommend setting a secure password. (think upper/lower case, special characters and numbers, at least 16 characters) As a side note, if you are not already using a password manager, I suggest you start. A good password manager like Roboform will sync your passwords securely across multiple devices (if you use the paid Roboform Everywhere version) and will generate strong passwords you can use.
After you do all this, you might find that you cannot connect to Home Assistant from within your local network. In chrome you can go to advanced and basically ignore the certificate warning. You should also be able to go to https://your_domain.duckdns.org:8123 without any error rather than using the IP address of the Pi.
Another site here has great information on setting up LetsEncrypt and helps you setup auto-renewal for your LetsEncrypt certificate. (Note for auto renewal, check that the certbot folder exists – depending on how you setup your system it may be in a Pi folder, not Haas!) It’s also worth following the advice on that site and setting up IP banning so that you are somewhat inoculated against password dictionary attacks. Also this video.
Really on the home stretch now!
Checking everything is working..
Next thing is to check if you can connect to the Home Assistant externally. If you did what I said and set a secure password for the API password in configuration.yaml, you can check this by going to this address in your web browser:
https://your_duckdns_domain_name.duckdns.org:8123/api/?api_password=your_api_password
Note to enter your duckdns domain name and your api password in that URL. I had a problem with my password. I had used an & in my password. I suspect it does not like the &. When I was trying to connect, I kept getting forbidden or 401 unauthorised. I suggest avoiding using the &.
If you have set everything up correctly, going to that URL will give you this message:
{“message”: “API running.”}
If you see this, happy days – you are just about to take the last bite of that elephant.
Setting up IFTTT with Google Home and Home Assistant
Last step here.
On your mobile device, Android or iPhone go to the IFTTT app and sign in using your Google account.
You will then need to go to the Applets page (sorry I’m being vague but on my computer it’s doing different things because I am already setup in there)
When you add a new applet, if you are anything like me, you will be confronted with a page that doesn’t immediately make it obvious what you need to do.
Now by all means call me crazy here but I have NO IDEA what I should be doing on this screen…. or at least I didn’t 🙂
The ‘secret sauce’ is clicking on the “+ This![]() ” You then type in Google Assistant and you will see a Google Assistant icon. Click on it and then select “Say a simple phrase. You will then be prompted for the Phrase you want to say and optionally 2 other ways to say it.
” You then type in Google Assistant and you will see a Google Assistant icon. Click on it and then select “Say a simple phrase. You will then be prompted for the Phrase you want to say and optionally 2 other ways to say it.
In my case, I entered:
- Turn on Lounge Lights
- Lounge Lights On
- Turn Lounge Lights On
Also next you enter what you want Google to respond back to you with. I entered “Turning on Lounge Lights” Then click on the Create Trigger button. (If you need screen shots of all this, maybe you shouldn’t be trying this!)
Next screen you will see that the “Then That” part of the screen is now in blue. Click on that. It will then ask you to pick an Action service. Type in Web and you will see an Icon for Webhooks. Click on it. On the next screen there is only one option – Make a Web Request so click on that.
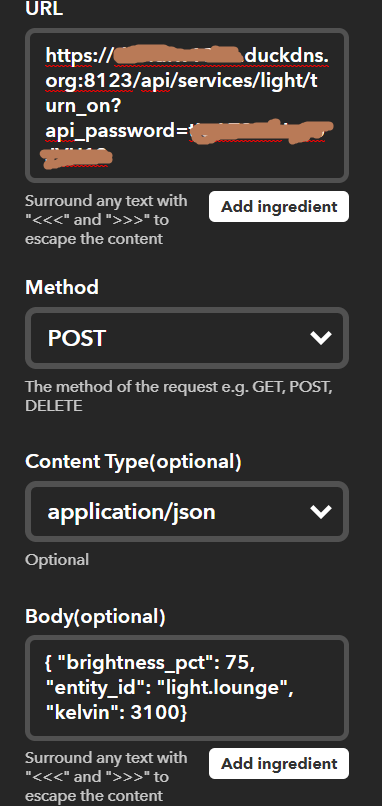
The prompts then are for a URL, a Method, A content type and a Body.
For the URL enter this:
https://your_duckdns_domain_name.duckdns.org:8123/api/services/light/turn_on?api_password=your_api_password
For the Method select POST from the drop down box.
For the Content Type select application/json
For the Body I entered:
{ “brightness_pct”: 75, “entity_id”: “light.lounge”, “kelvin”: 3100}
That body text will be somewhat familiar to you if you set up the automation previously as it is the exact same text string.
This sets the brightness to 75%, the lights to a warm white and sets the ID I am controlling to the Lounge room lights.
It should all look something like this:
Save this and then you should be able to turn your lights on by saying Hey Google, Turn on lounge lights.
Now this is just an example and you can set it to turn off lights or control other lights obviously.
There’s bound to be holes in this guide so please let me know and I’ll try and fill them in or clarify anything that needs clarifying.