Originally posted 2018-09-04 16:52:23.
I have been running Home Assistant on a Raspberry Pi3B and also a Raspberry Pi based Apple Time Machine and a video down-loader on yet another RPi. In addition to this, I have another RPi3B that runs my coffee roaster and another spare RPi 1B. I did mention to my son recently that Raspberry Pi’s are addictive!
I had been having some problems with one of the old RPi1B’s that I believe was not caused by the hardware but rather by the requirements of the software running and it just seemed to lock up one of the applications all the time. I had previously done a whole fresh install and installed the latest Raspbian (stretch) on it and reinstalled from scratch the other software but it just does not seem to be able to cope with applications just not responding and locking up.
I did also consider buying another RPi3B however they do get quite expensive by the time you add a power supply (the RPi1B power supply is inadequate for a 3B+), a case and an SD-Card. You’re not going to get that much change from AUD$120. As an alternative, a lot of people seem to like the Intel single board computer called a NUC. These run from a lowly celeron based chip to an i7 based chip and are tiny ~ 125mmx125mmx50mm or so.
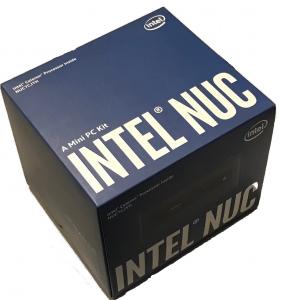 After a lot of looking and hand wringing, I settled for a Celeron, 7th generation and got a NUC7CJYH bare-bones kit – the most powerful of the Celeron based NUC’s. Being a bare-bones kit meant I needed to also buy RAM and a hard drive. I settled on 8Gb of RAM (the maximum) and got a 240Gb SSD drive. All up, this cost around 3 times the cost of a RPi3B however something of a difference in performance!
Having purchased the hardware it was then time to consider first of all the operating system I was going to run on it. Of course this is going to be a ‘head-less’ installation meaning except for the initial setup it would never be connected to a monitor. It seemed an obvious and common choice for running this kind of system is to install some variation of Linux. Looking at the Intel NUC site, they seem to have guides to install Ubuntu and many people running home assistant seem to use this as well and I had almost decided that was the way to go when in a chat with a couple of users, they recommended that I use Debian. Debian for Stability, Ubuntu for features and the bleeding edge was their feeling. So on that basis I decided to run Debian 9 – ‘Stretch’ for my system. Raspbian is a customised version of Debian specific to the Raspberry Pi which to me was also an attraction.
Getting your system ready to install Linux
There are a couple of things you will need to do regardless of which operating system you decide to install.
First thing is to download the CD/DVD image of the Linux distribution you are going to use. In this guide I am going to assume you are installing Debian as I did. Navigate to the downloading debian web page here where in addition to downloading the actual software there is also a downloadable installation guide linked about half way down the page. If you select the stable release link, you will see the installation guide there as well as the CD and DVD downloads. I installed the stable release DVD’s although in actual fact you only need the first DVD as the other ones only include additional packages which the aptitude package manager will grab as needed from the internet anyway. At the time of writing, the current stable release was Stretch version 9.5
I had a couple of issues which I will explain later however, I believe you can just copy the .ISO file to a USB stick and can then boot and install Debian from that. However, as I said I had a few issues so I ended up using Win32DiskImager or etcher to ‘burn’ the image to the USB and booted off that instead. Just be aware that is an option if you have any problems booting from the ISO file.
This Debian distribution is based on the LTS (Long-term-support) kernel version 4.9 and is reported as:
Linux Debian 4.9.0-8-amd64 #1 SMP Debian 4.9.110-3+deb9u4 (2018-08-21) x86_64 GNU/Linux
This post assumes you are setting up a new Debian system, not installing on hardware running some other operating system. Additionally, in my case, as this is a ‘server’ I did not install and desktop and my only ‘access’ is via a terminal (either SSH via PuTTY or the like; or by plugging in a HDMI monitor & keyboard directly into the NUC). Not installing a desktop environment reduces the number of ‘default’ packages installed by about 1000 (I kid you not). My NUC is sitting in my comms cabinet and apart from the initial setup has never had a monitor, keyboard or mouse attached.
Specific Checks and changes before you install Debian
- From the Intel NUC page for your device, download and update the BIOS for your system. On the NUC you press F7 while it is booting having copied the BIO file to a USB stick. You need to check the specific details for your model.
- I set the NUC to boot on power on so it’s not sitting waiting for you to do something before it starts up. (for example if there is a power failure, when the power comes back on you don’t want to have to press the button for it to start up.)
- I had to set it to boot from USB – and also to boot an ‘unapproved’ operating system or something like that. It’s a UEFI security measure ‘secure boot’. You will need to disable this. You can access the BIOS by pressing F2 as it boots.
- Have the Debian ISO on the USB stick. This is where I had a problem I think was that I didn’t have the ‘unapproved’ operating system enabled so it would not boot which is when I used Win32diskimager to ‘burn’ the installation to the USB which still would not boot because of the ‘unapproved’ OS. The only ‘approved’ OS is Windows I think! This option may be called ‘secure boot’ Reading the docs just now it seems that ‘burning’ the image is the correct procedure! Hey.. no one died!
- I also set the BIOS for Linux instead of Windows (so as to disable fast boot)
The message is if you don’t get the Debian installer starting up properly, you might need to tweak some options until it does.
The Installation Process – Debian on a NUC
All being well, you should now be able to plug the USB stick in a port and power-up the NUC and it will boot into a graphical menu. From this menu, if you want a ‘headless’ server type installation, select ‘Install’ and not ‘Graphical Install’ Best to check the installation document. There can be some advantages in using the graphical setup (language selection being one).
As part of the installation you will be asked some questions… locale, keyboard etc. THe Country and Location are important as they will determine the timezone of the system. You might also be asked about installing a driver for the WiFi – I don’t remember being asked that.. we will cover this later. Again, in my case this is a server and it’s connected by Ethernet.
The installer will also ask which mirror you want to use for downloading packages and updates. I did select a server close to me (Australia) however recently I attempted an update and it could not get a response so I ended up using one in Germany! Go figure.
You will also be asked to setup a root password. DO NOT SETUP A ROOT PASSWORD! – leave it blank otherwise sudo won’t be installed which will cause you a whole lot of problems.
The installer will ask you to setup the disk partitions – I used LVM (logical volume management) and whole disk – I didn’t make multiple partitions. I did originally select LVM and encryption however this meant that every time the system booted I had to enter the decryption password – exactly what you want for a server/headless setup NOT! I used the ‘all files in one partition’ scheme. If you issue the lsblk -f command you can see how the disk is partitioned.

If you get an option to install the apt (aptitude package manager source list) just accept the defaults for now.
Once the installation is finished, you should be able to use PuTTY to ssh into the NUC using the username and password you configured. Post installation there are some things to configure and add.
Post Installation
- Add username to sudoers so you don’t have to enter password all the time. Otherwise every-time you use sudo you will be prompted to enter your password.
From the command line:
$sudo visudo
Add:
username ALL=(ALL) NOPASSWD: ALL (Note: enter your username here, not username)
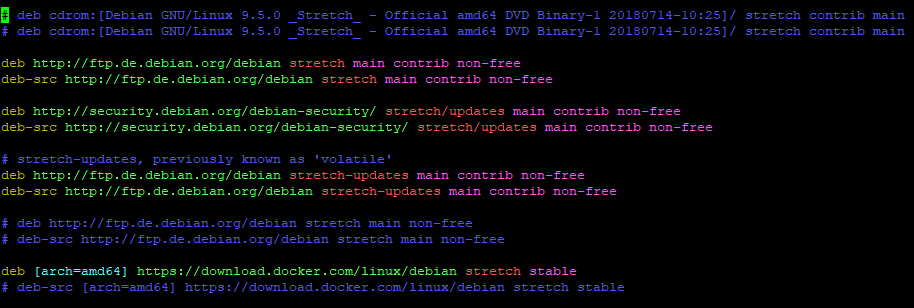
I added it to the bottom of the file. use ctrl+x to quit and follow the prompts to save. It uses the same interface as nano. - When I tried to add a package using apt, it kept prompting me to insert the CD-ROM (aka the USB stick). To fix this edit sources.list.
sudo nano /etc/apt/sources.list
Comment out the appropriate media line from sources. You can also take the time to add contrib and non-free. My sources.list looks like this:
- When starting up and the NUC was connected to a HDMI monitor, I noticed 2 error lines saying something similar to this:
“Warning failed to connect to lvmetad. Falling back to device scanning.”
I found a solution suggesting you should disable lvmetad by adding use_lvmetad = 0 in /etc/lvm/lvm.conf
I tried that and it made no difference. I also saw advice the error can just be ignored. - Next, now would be a good time to do an upgrade. Enter the following command:
sudo apt-get update && sudo apt-get -y dist-upgrade
You can also use apt instead of apt-get. So what are the differences?
apt-get upgrade will not change what is installed (only versions),
apt-get dist-upgrade will install or remove packages as necessary to complete the upgrade,
apt upgrade will automatically install but not remove packages.
apt full-upgrade performs the same function as apt-get dist-upgrade.
Are you confused yet? We haven’t even installed Docker yet! - I also ran this command:
sudo dmesg
and scanned for red lines=errors. I found some related to CIFS – a samba share I was mapping on my NAS and also some errors related to the wireless adapter on the NUC. I fixed the CIFS error by switching to NFS. The CIFS error was related to an old version of SMB protocol (default is version 1.0) I could have used a newer protocol however NFS is supported and better to use in my opinion. - To install the Wireless LAN adapter, Add Realtek firmware from the non-free source. If you added non-free source as per point 2, you are good to go. Otherwise add following to:
sudo nano /etc/apt/sources.list

deb http://ftp.de.debian.org/debian stretch main non-free

deb-src http://ftp.de.debian.org/debian stretch main non-free
Then to install the firmware:
sudo apt-get update

sudo apt-get install firmware-realtek
Once you have done that, with any luck running dmesg again will show no red errors. If there are still errors, depending on your care factor, you’ll need to track them down and fix them yourself. - I also installed a few other packages:
sudo apt-get install net-tools

sudo apt-get install cifs-utils

sudo apt-get install nfs-common
These were for CIFS, NFS and to get some network tools so I can do netstat etc. What you install is up to you. (Note: net-tools is depreciated now and has been replaced by iproute2. See here for some details.) - Create and deploy a public/private key for SSH
While you can continue logging in with a username and password via PuTTY, it’s more secure and simpler if you use the PuTTYgen program to create a public and private key for authentication and login. I did a blog post previously covering PuTTYgen here. When you create this pair, you save the private key to a file (I save this without a passphrase) and you copy and paste the displayed public key to a file called authorized_keys. Place this file in the /home/your-username/.ssh folder. You will need to create the .ssh folder! - Setup PuTTY and WinSCP connections.
With a view to configuring and setting up Home Assistant on the NUC, some of the settings are going to be non-standard. To be able to ssh to the debian host, the settings are standard.. use port 22, on the connections>data page enter your username, on the connection>SSH>Auth page enter your private key file that you saved from PuTTYgen. When I set up the authorized_keys I didn’t lock out using username and password as I describe in the blog article – if you do or not is up to you. To use the community ssh add-on in Hass.io, you will need to set up the ssh connection a little differently. First, you can’t use port 22 as port 22 is already being used by the host. Just pick another port number – I chose 622 for no particular reason. For the login name on connections>data page enter root. If you don’t set the ssh add-on to use root as the username, you won’t be able to use WinSCP as the add-on will only let you use SFTP so I suggest you use root here. As before point connection>SSH>Auth to your private key as per the debian host configuration. Make sure you also have a copy of the authorized_keys file as you will enter that key when you configure the add-on in hass.io.
For WinSCP settings, again there are differences between the debian host and hass.io. First for the Debian host, I use the file protocol SCP, a username as my standard debian user and port 22. You do not configure a password. On the Environment>SCP/Shell page select sudo su – otherwise you won’t be able to write to any folders or edit any files. On the SSH>Authentication page again point it at your private key. To configure WinSCP for the hass.io ssh add-on, select the SFTP protocol (otherwise you won’t be able to use WinSCP at all). Set the port number to 622 or whichever port you specified and use root as the username. Again, to use SFTP and WinSCP you must configure the add-on to allow SFTP and if you do that you have to use root as the username. Again no password is required. You then only need to add your private key as per the host configuration and there is no SCP/Shell page to configure.
After you have done this, you will have 2x PuTTY connections and 2x WinSCP connections. The debian host connections should work now however until you have home assistant and hass.io installed, the other ones won’t work. Be aware that even though the debian host connections give you full access to the NUC, none of the special hass.io ssh shell commands will work – you will need the hass.io add-on ssh shell for those. For WinSCP, the host connection will give you access to all the config files and you may never use the hass.io specific one. Just be aware as the hass.io specific connection is inside the docker container, the contents of folders might be different to what you see on the host! (as an example, in the host connection, the add-ons folder will show all your host addons… in the hass.io addons folder it will only show local addons and is probably empty. In hass.io /backup folder you will find all your backups but the /backup folder in the host does not even exist)
Now installing Docker
So now we have a working, up-to-date debian based Intel NUC, we need to install Docker.
I had never used Docker before I started with Hassio. There is a good article about Docker here.
Before I started using Home Assistant and even until very recently, Docker was a bit of a mystery to me. I didn’t understand what the point of it was/is. Having now used it and understanding it a bit better, I can see the benefits.
From the docker documentation:
A container runs natively on Linux and shares the kernel of the host machine with other containers. It runs a discrete process, taking no more memory than any other executable, making it lightweight.
By contrast, a virtual machine (VM) runs a full-blown “guest” operating system with virtual access to host resources through a hypervisor. In general, VMs provide an environment with more resources than most applications need.
Just to illustrate this point or one of the benefits… we are going to install docker on the NUC. However like with most things in Linux, you can’t just install an application because everything has dependencies… if package ‘xyz’ is dependent on packages ‘abc’ and ‘def’ and etc… then you have to install those packages first and then install ‘xyz’ at the end. But what happens if ‘abc’ depends on package ‘mno’ It can be quite a circular process.
Well with docker, you just create the ‘container’ and the container contains EVERYTHING it needs to run. So to create a container is one command and you’re done. Let that sink in for a bit!
Anyway, best thing is to read the official docker docs here.
Next we need to install (you guessed it) the docker dependencies. Do that by executing this command:
sudo apt-get install \

apt-transport-https \

ca-certificates \

curl \

gnupg2 \

software-properties-common
Note that is all one command. It could also be represented by typing in:
sudo apt-get install apt-transport-https ca-certificates curl gnupg2 software-properties-common
Next we need to add the Docker Key
curl -fsSL https://download.docker.com/linux/debian/gpg | sudo apt-key add -
Then add the docker repo to sources.list
sudo add-apt-repository \

"deb [arch=amd64] https://download.docker.com/linux/debian \

$(lsb_release -cs) \

stable"
OR if you prefer one line:
sudo add-apt-repository "deb [arch=amd64] https://download.docker.com/linux/debian $(lsb_release -cs) stable"
Then install docker with the following 2 commands:
sudo apt-get update

sudo apt-get install docker-ce
Next add your normal username to the docker group so you don’t need to use sudo all the time:
sudo usermod -aG docker username
Logout and login again so group membership is verified
You should then test docker is working by executing this command:
docker run hello-world
If everything is installed and working now, you should get a message.
Next we want to set Docker to run on boot:
sudo systemctl enable docker
Now we can install Home Assistant Supervised
NOTE THESE INSTRUCTIONS ARE NOW CHANGED AND NEED TO BE UPDATED> The official instructions are now here
I followed the instructions provided on the Home Assistant site here. I did NOT install the HassOS version for a NUC, I installed the generic linux install for Hass.io. Since I originally wrote this post, Hass.io has been renamed to Home Assistant Supervised and it is only ‘supported in Debian’. I have updated these instructions to point to the new repo. Note that addins any packages will result in your installation being considered unsupported and it can detect things like watchtower and tell you to remove them!
There are some stated dependencies for Home Assistant there. This is confusing as with Docker as already stated, all the dependencies are wrapped in the container. I did however install the dependencies with this command:
sudo apt-get install apparmor-utils apt-transport-https avahi-daemon ca-certificates curl dbus jq network-manager socat software-properties-common
For the record I didn’t use the github instructions and just did the generic linux install from the home assistant site (as per the above link) here:
Note that either of these commands should be run as root so first:
sudo su then:
curl -sL https://github.com/home-assistant/supervised-installer | bash -s
However, from the Github page, there is a NUC specific installation command for the Hass.io on a NUC. There are also other specific machine types there.
curl -sL https://github.com/home-assistant/supervised-installer | bash -s -- -m intel-nuc
I understand that the nuc specific install also installs the usbutils package. I have not noticed any problems having run the standard generic linux package but if I was installing again I would install the correct package. It’s worth checking the Github page in case there is a specific install for your hardware.
When that is done, fairly soon you should be able to navigate to http:// your-ip-address:8123 and home assistant will be up and running.
The instructions on the HA site have been removed and the Github page shows incomplete information since I made these instructions.
Also, you might see a warning about modem manager:
[Warning] ModemManager service is enabled. This might cause issue when using serial devices.
NOTE:
If you did an alternative install of Home Assistant on Linux (e.g., installing Ubuntu, then Docker,
then Home Assistant Supervised) then the modemmanager package will interfere with any Z-Wave (or Zigbee)
stick and should be removed or disabled in the host OS.
Failure to do so will result in random failures of those components, e.g., dead or unreachable Z-Wave nodes,
most notably right after Home Assistant restarts. Connect to your host OS via SSH, then you can disable with
sudo systemctl disable ModemManager
and remove with
sudo apt-get purge modemmanager (commands are for Debian/Ubuntu).
Restoring a Snapshot
If you are moving to the NUC from an already running Hass.io instance on a Raspberry Pi perhaps, you can copy a snapshot to the /usr/share/hassio/backup folder and then in the Hass.io side panel, from the snapshot tab, reload snapshots and restore your snapshot.
A couple of issues I had when I did this:
- The official SSH add-on does not work. You must install the Community SSH & Web Terminal add-on from the community add-on repository.
- You will have to change the ssh port from 22 to something else in the SSH & Web Terminal add-on. You will still be able to use port 22 to ssh into the host. If it isn’t already there, add the authorized_keys data to the add-on.
- I needed to uninstall and reinstall the configurator addon – I’m using the one in Daniels own repo as it is kept better up-to-date than the official repo.
- I needed to uninstall and reinstall Daniel Welsh’s Dropbox backup addon. Neither configurator or dropbox would start till I did that!
- Any add-ons that won’t start – I had a few – just uninstall them and re-install them again. I needed to re-add the other repositories I ‘lost’ as well.
- You should stop Home Assistant and delete the database. I often forget that and just delete the database without stopping Home Assistant and it doesn’t seem to cause any problems. After deleting the database, restart Home Assistant. If you don’t delete the database you will see a lot of database errors in the log file.
- I found restarting home assistant happens in less than a minute. Much faster than HassOS and ResinOS on the Raspberry Pi.
Post Docker and Home Assistant Installation
So now that you have a home assistant and docker installation, what else can you do with your NUC?
A good place to have a look at is the https://www.linuxserver.io/ site which has containers from the community for a vast variety of uses.. as simple as just ‘pulling’ the image and creating the container.
Probably the easiest way to understand this is to install Portainer from https://www.portainer.io/installation/
To install and run Portainer, just issue these commands:
docker volume create portainer_data

docker create --name=portainer --restart=always -p 9000:9000 -v /var/run/docker.sock:/var/run/docker.sock -v portainer_data:/data portainer/portainer

docker start portainer
If you get an error, check you added the debian user to docker group as per my earlier instructions.
Simple! But what does it all mean?
The first command creates a volume where portainer will store it’s data.
The second command creates the container called portainer, sets it so that it will always run, sets it so that you access it via port 9000, tells it where the data is located and also tells it which image to run.
The last command starts up the container.
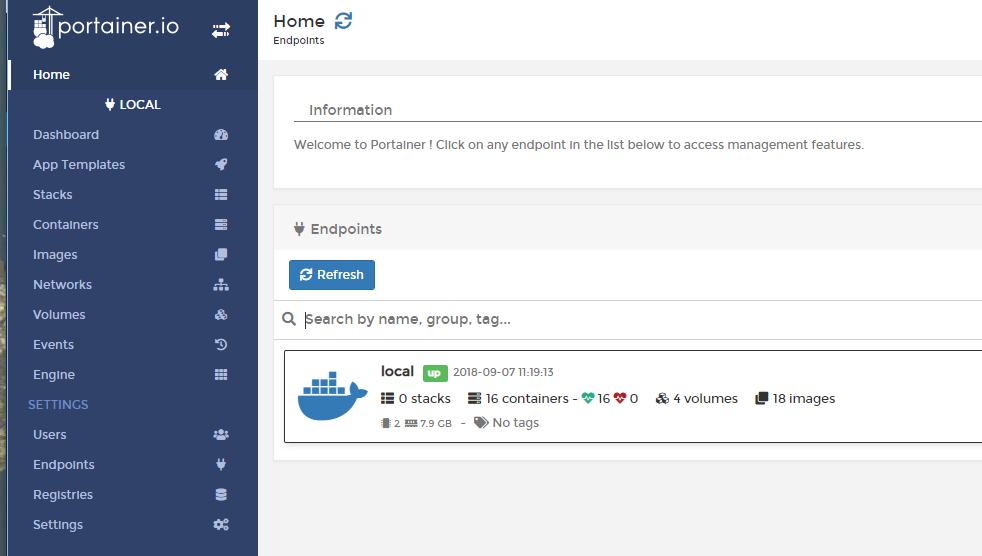
Once the container is started, you can access portainer by going to http:// ip-address-of-nuc:9000 and you will be able to create an account. Select ‘local’ when prompted. You will then see something like this:
Click on the Containers option in the menu bar and you will see all your current containers.
 You can see these are all containers created for my Home Assistant Hass.io addons.
Other containers were installed from https://hub.docker.com/u/linuxserver/ – just browse the list and follow the instructions to install any containers that interest you.
One other container I installed is called Watchtower from https://github.com/v2tec/watchtower – I use watchtower to automatically keep my other containers up-to-date however I exclude Home Assistant containers! This is very important and is an option when you set up watchtower to tell it which containers t monitor. Hass.io itself has a built in means of keeping itself up-to-date.
One other thing… keep Debian and Packages up-to-date!
It is important that you keep everything up-to-date!
As far as Debian and Docker are concerned, run:
sudo apt-get update && sudo apt-get -y dist-upgrade regularly
Then for Hass.io itself, it will notify you in the Hass.io side panel or even on one of your cards when there is an update available (if you set up a sensor). Make sure you keep hass.io up-to-date otherwise you might eventually want to update something and it then becomes a major drama because things change in how components are configured and if you get too far behind it’s much harder to update everything so it runs smoothly again. There is a new release of Home Assistant every 2 weeks. Make sure to read the release notes, make whatever changes need to be made and update.
For everything else, watchtower will keep your other containers up-to-date. (Watchtower will also cause a message in the Supervisor>System panel that your installation is unsupported)
One other thing I did do was when I created other containers I made a data folder for them at /home/docker. I then found a script and a package to zip up my configuration folder and upload it to dropbox every night with a crontab. Here is the link https://github.com/andreafabrizi/Dropbox-Uploader
The only other thing is a lot of people use a docker-compose script and file to handle updates. I found this was confusing and it did things I didn’t understand! In any case, you can use portainer to tear down a container and update it if you wanted to or if you use watchtower you won’t even need to worry about doing that!
The choice is yours!
Let me know if you need any more information or have any problems in the comment section or use the contact us form
These instructions were last updates August 15th 2020 following some changes by the HA team.